
Step 8 - The first new workbench, French cleats and cabinet refurbs.

A new upper cabinet

Upper cabinet
installed

Upper cabinet open
[3/8/2005]
Although I'm very much focussed on practicing my woodworking skills by building my own shop cabinets and fixtures, last night's local auction forced me to do a bit of math and make an exception. I've had no luck in the past with buying shop cabinets at auction. They just sell for more than I expected to pay for used, somewhat beat up stuff. Although they're usually still worth what they sell for, I'm pretty cheap when it comes to auction goods. I'm determined not to get caught up in 'Auction Fever' in which bidders often pay far more than they should for things just due to the excitement and competition of bidding. This happens on Ebay a great deal. Last night, however, was a fantastic exception.
There are two main auctions in my city, Bob's and Ryder's. (There's also Godbehere, but I haven't dropped in on that one much yet.) I often refer to Bob's as "The Good One" and Ryder's as "The Crappy One". This is because Bob's is a slightly better, more organized operation with a newer building and a slightly higher level of clientele. More average and 'upscale', if you can call it that. Ryder's auction, however, is very much low-end and the quality of stuff sold there is reflective of this. I have to admit, though, if you want some "STUFF" and you want it cheap, Ryder's is the place to go.
So, I took the kiddo over to 'The Good Auction' the other night on a whim, to see if I could get lucky on some Stanley planes or something and found some cabinets. I found one I was interested in enough, got a bid number and waited nearby for the action to come down my way. To my amazement, I managed to get the rolling cabinet for $7.50 and the big, heavy bench/cabinet for a measley $12.50!

'New' bench
and CMS cart
[3/5/2005]
Here's a progress shot of a couple of the metal cabinets I'm cleaning up. One is painted, the other is not. I hope to finish and hang these this weekend.
Here's a progress shot of a couple of the metal cabinets I'm cleaning up. One is painted, the other is not. I hope to finish and hang these this weekend.

Painting some
metal cabinets
[2/28/2005]
I built this first workbench last weekend (2/19/05) as much to serve as a storage unit for the totes of junk in the shop as for a bench. I personally like really deep work surfaces providing a lot of workspace, but I may have made this one too deep to be truly efficient. In the near term however, it works well because I can store the totes 2-deep on the shelf and on the floor. Also, the 2x4 frame tops with 4x4 end-posts ended up not being nearly as sturdy as I had thought. This is another reason I'm sure I'll rebuild this unit this summer.
I built this first workbench last weekend (2/19/05) as much to serve as a storage unit for the totes of junk in the shop as for a bench. I personally like really deep work surfaces providing a lot of workspace, but I may have made this one too deep to be truly efficient. In the near term however, it works well because I can store the totes 2-deep on the shelf and on the floor. Also, the 2x4 frame tops with 4x4 end-posts ended up not being nearly as sturdy as I had thought. This is another reason I'm sure I'll rebuild this unit this summer.

First
semi-permanent
workbench
I had Lowe's cut 3/4" MDF for the shelf and top to save a bit of time and because I would have trouble handling sheet goods that heavy by myself. This works pretty well as an interim workbench and most importantly was inexpensive at a cost of around $50 (MDF, plus 3 new 2x4s). The rest was built with shorter 2x4 cutoffs I already had on hand. (Click the first image to the right for a larger, animated shot of the new bench area. It shows a before/after view.)
I've begun experimenting with French cleats for hanging wall fixtures, including cabinets. I started repainting some old utility cabinets I bought from a friend for $15. 3 metal wall cabinets, one wood. They're nothing fancy, but much more than I had before and far cheaper than anything I could have bought at Lowe's. Since I'm all about keeping to the budget, I picked up some general purpose white latex paint at the Habitat for Humanity ReStore for five bucks a gallon and went to work spiffing up the cabinets I have. My daughter, Erin, offered to help so I gave her a brush and she did a great job. :) I've also had two small one-door cabinets sitting around for a couple of years which I kept telling myself I'd use one day. That day has come. Yay!
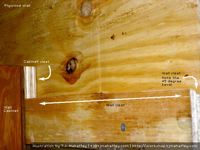
All in all, I'm quite pleased with how the first set came out when hung on cleats. What surprised me most was how sturdy and stable they are on the cleats. Best of all, they're fully modular and easy to move around and reconfigure. I love that. I've embellished a couple of photos of my French cleat efforts for your enjoyment. (Feel free to re-post them or distribute these illustrations if you like, but please leave the credit line on them and link back to http://workshop.tjmahaffey.com if you do.)
Another important element of my cleat system (and others) is a spacer strip. This ensures that the fixtures and cabinets hang straight out and don't pitch forward when hung. (Fig. 3)
I've begun experimenting with French cleats for hanging wall fixtures, including cabinets. I started repainting some old utility cabinets I bought from a friend for $15. 3 metal wall cabinets, one wood. They're nothing fancy, but much more than I had before and far cheaper than anything I could have bought at Lowe's. Since I'm all about keeping to the budget, I picked up some general purpose white latex paint at the Habitat for Humanity ReStore for five bucks a gallon and went to work spiffing up the cabinets I have. My daughter, Erin, offered to help so I gave her a brush and she did a great job. :) I've also had two small one-door cabinets sitting around for a couple of years which I kept telling myself I'd use one day. That day has come. Yay!
All in all, I'm quite pleased with how the first set came out when hung on cleats. What surprised me most was how sturdy and stable they are on the cleats. Best of all, they're fully modular and easy to move around and reconfigure. I love that. I've embellished a couple of photos of my French cleat efforts for your enjoyment. (Feel free to re-post them or distribute these illustrations if you like, but please leave the credit line on them and link back to http://workshop.tjmahaffey.com if you do.)
Another important element of my cleat system (and others) is a spacer strip. This ensures that the fixtures and cabinets hang straight out and don't pitch forward when hung. (Fig. 3)
Wall cleat - Fig. 1

Wall cleat - Fig. 2

Cabinet wall cleat
spacer - Fig. 3

